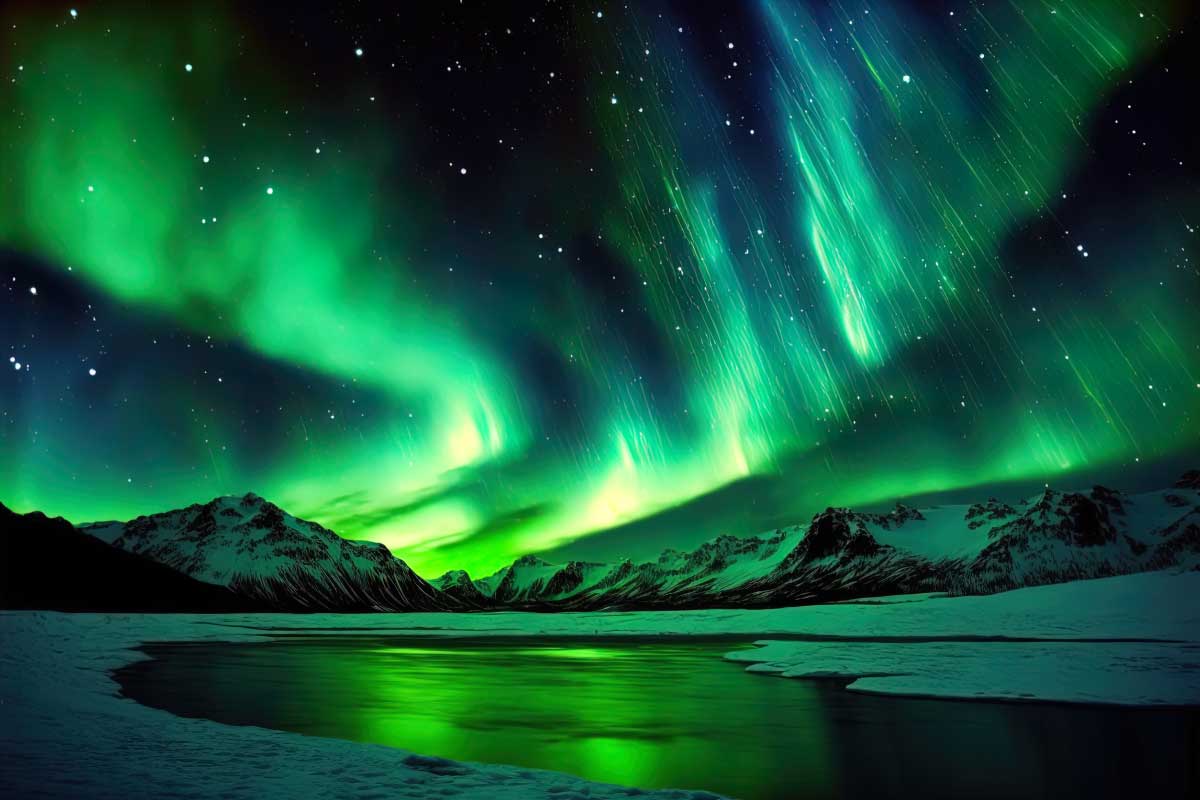
Photographing the Northern Lights, also known as Aurora Borealis, is an exciting and challenging endeavor. This article will provide a comprehensive guide on how to photograph the Northern Lights, covering planning, equipment, camera settings, composition, and post-processing.
Planning and Preparation
1. Understanding the Northern Lights
The Northern Lights are a natural phenomenon caused by the collision of solar particles with atmospheric gases. This collision creates vivid colors, most commonly green but also purple, red, pink, and blue.
Usually, you are more likely to see the Northern Lights the closer you are to the north magnetic pole (or the south magnetic pole in the case of Southern Lights, also known as Aurora Australia). Additionally, you are more likely to see them during the winter and during increased solar activity. Solar activity has an 11-year cycle, and aurora activity tends to peak during solar maximums.
2. Choosing the Location
Ideal locations are found in the “auroral zone,” typically 10° to 20° from the magnetic poles. Destinations like Iceland, Norway, Canada, Alaska, and northern parts of Russia and Finland are popular. However, it’s very possible to see the Northern Lights in the northern parts of the United States and Europe as well.
Look for spots with clear northern horizons. Rural areas with minimal light pollution enhance visibility. National parks in northern regions are often great choices. Additionally, bodies of water can provide stunning reflections and add to your composition.
3. Timing and Weather
Check the aurora forecast and weather conditions. Websites like the NOAA’s Space Weather Prediction Center provide forecasts.
Clear skies are crucial. Use weather apps and websites to track cloud cover. The aurora can be visible any time after dark, but peak hours are typically between 10 PM and 2 AM local time.
Long, dark nights in the winter months offer the best viewing opportunities. The best time is typically between September and April.
4. Safety and Comfort
Dress warmly in layers, considering the extreme cold in these regions. Wear thermal clothing, hand warmers, and insulated boots.
Consider personal safety in remote areas. Travel in groups and inform someone of your plans.
Bring snacks and hot drinks to keep your energy up during long nights.
Equipment Essentials
1. Camera
A DSLR or mirrorless camera with manual mode capability is ideal. Cameras with good high ISO performance are preferred.
2. Lenses
Wide-angle lenses with a large aperture (f/2.8 or wider) are recommended to capture more sky and light.
3. Tripod
A tripod rated for heavy weight ensures stability in windy conditions during long exposures. Consider a tripod with spiked feet for stability in snow or ice.
4. Extra Batteries
Keep spare batteries in an inner pocket close to your body to keep them warm as cold weather can drain batteries.
5. Other Accessories
Here are a few additional accessories that can be helpful:
- Remote shutter release to reduce the chance of camera shake.
- A lens hood to help prevent lens frost.
- Memory cards with high write speeds for capturing high-resolution images or timelapse sequences.
- Headlamp with a red light to maintain night vision.
Camera Settings for Northern Lights Photography
1. Manual Mode
Manual mode is essential for controlling the exposure triangle: aperture, ISO, and shutter speed.
2. Aperture
A wide aperture, such as f/2.8, f/2, or even f/1.4, allows more light into the camera sensor.
3. ISO
Higher ISO settings increase sensor sensitivity to light. Test your camera beforehand to determine how high you can push the ISO before noise becomes an issue.
4. Shutter Speed
Shutter speeds can range from 5 seconds for intense auroras to 30 seconds for faint ones. Remember, longer exposures can turn sharply defined auroral curtains into a soft glow.
5. Focus
Autofocus is often unreliable in the dark. Instead, focus manually on a distant light or use the infinity mark on your lens.
6. White Balance
Experiment with white balance to see how it affects the colors of the aurora and the night sky.
Composition Tips
1. Foreground Interest
A strong foreground can turn a good photo into a great one. Look for opportunities to frame the lights, like through tree branches, over a mountain range, or reflected in a body of water.
2. Rule of Thirds
Be mindful of rule of thirds best practices. Positioning the aurora along the top third can emphasize a dramatic foreground, while placing it on the bottom third highlights the expanse of the night sky.
3. Leading Lines
Roads, rivers, pathways, or even the line of the aurora itself can draw the viewer’s eye into the image.
4. Reflections
Use calm lakes or rivers for mirror-like reflections. Experiment with different angles and perspectives.
Shooting Techniques
1. Long Exposures
Balancing the length of exposure with the movement of the aurora is key. Too long, and you lose detail; too short, and you may not capture the full effect.
2. Timelapse
Set your camera to take a photo every few seconds. This requires a large memory card and plenty of battery life.
3. Panoramas
Shoot multiple overlapping images and stitch them together to create panoramic shots. Ensure each frame overlaps by about 30-50%. Use manual settings to keep exposure consistent across shots.
Post-Processing Northern Lights Photos
1. Editing Software
Use software like Adobe Lightroom or Photoshop for editing.
2. Adjusting Exposure
Balance the exposure triangle in post-processing to bring out the best in your shots without introducing noise.
3. Color Correction
Play with hues and saturation to accurately represent the scene as you saw it, or to artistically enhance the photo.
4. Noise Reduction
Apply noise reduction, especially if high ISOs were used. Be cautious with noise reduction settings to avoid losing detail in the aurora.
5. Sharpening
Sharpen just enough to bring out details in the stars and the texture of the aurora.
Conclusion: How to Photograph the Northern Lights
Capturing the Northern Lights is a blend of preparation, patience, and skill. With the right equipment, settings, and techniques, you can photograph this mesmerizing natural wonder, creating memories and stunning images that last a lifetime. Remember, each aurora display is unique, so experiment with different settings and compositions to find what works best for the specific conditions you encounter.